Sunday, January 29, 2012

Small Bedroom Rebuild

We finished the third bedroom! It was the smallest of the bedrooms and had a huge window in it. This part of the trailer was leaning and the roof was leaking very badly. The original walls were tan basic Sheetrock with paper overlay. We removed the entire ceiling and installed two layers of insulation. We rebuilt the back wall, took out the huge (broken) window and installed an exterior door.


The sign is sitting in the broken window. The subfloors needed no repair.


Trailer was releveled. Back wall was replaced with 2x4s.

First layer of R-19 went up next to rolled metal roofing and held up with plastic sheets and staples between trusses.

Second layer of insulation was rock wool lain over top stapled up plastic. Plastic was used on all walls for vapor barrier.

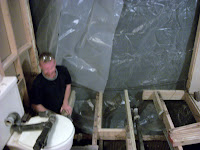
This picture is looking toward same back corner and huge window through the area where the new guest bathroom was built. The hallway is to the right of the black pipe.


Once the window came out we walled that section in and put an exterior doorway at the end of the hallway. The bathroom was built first. We moved on into the third bedroom and began putting up the drywall for walls and ceiling. Painting and trim came next. I decided upon wood flooring for that farmhouse look. We went cheap with 1/2 inch plywood. Those were zipped into 8 inch wide x 8 foot planks. Once they were put onto the subflooring and screwed down I sanded them twice, stained them to match the trim and polyurethaned. The floor feels like walking on silk! Our most favorite room to chill in at this point in time for sure is the blue room! Take a look at how she looks now.

This is the back corner! The tv is where the huge window was. This is the media center project from earlier in the blog.

The door lets natural light in during the majority of the day. This exit will have a 10 foot x 24 foot porch on it soon.

How about this for plywood flooring! Hallway leads to third room.

All his hard work gave him a room to play movies, music and video games.

The hardest part of this floor from my thinking it up to final product was the measuring for the screws to be drilled.

This is a small room. The ceiling is a spanish knife that took me about 3 hours for this room and hallway.

The floor as seen from the doorway down the hall.
We spent so much time on trim and I am now a professional stainer and floor finisher. The floor is what made us want to continue on with the complete rebuild of the house! If you have questions or want to know more about any of the work, colors, design or how-to please feel free to contact us.

 More to come!

Guest Bathroom Rebuild

We have finished the guest bathroom rebuild! We started with a 1985 mobile home. The exterior walls were rotted through to the interior. The interior was a typical trailer with brown flowers on the thin wallpapered drywall and plastic fixtures. The toilet had been leaking for many years and created quite a bit of rot along the baseboards. The walls were damaged by water, the tub was busted, the sink was plastic, the ceiling had been leaking and a nest of carpenter ants were living in the wall. So, we ripped it all out and here is where the demolition ended and rebuilding began on the guest bathroom.

The exterior had to be completely rebuilt using 2x4s.

This wall, toilet and flooring all came out!

Here we are repairing the floor joists. The tub was moved for optimal support.
The joists had to be reinforced and repaired from the water damage. The subfloors were replaced with new wood and the walls were moved out one foot to allow us a larger bathroom. All walls were rebuilt using 2x4s. I insisted on using plywood for walls instead of drywall to alleviate water damage to drywall in the future. 

We used plywood for the ceiling and walls. They were sealed with Kilz then painted. We opted for a natural feel. We started with white trim, we later replaced it with wood trim to match the rest of the house. 

The toilet was replaced with an enviro-flush bucket system 1.6gal water and 10+ rating for flush! (Home Depot $80)
All fixtures in bathroom are brushed nickel.

Window for fresh air and natural light. The trim stain is English Chestnut.
The baskets were a thrift store find at $5.35 total.

Reclaimed interior door cleaned and painted. (Free)

Nice sturdy tub surround that screwed directly to the plywood walls.

Made in USA steel tub! (Home Depot $109)

CFL bulbs are used in new lighting throughout the house. Window up high from optimal privacy.


Recessed toilet for privacy in case children bolt in the bathroom door. I plan to repurpose a dresser or cabinet for beside the sink for medicine cabinet/toiletry storage. Hooks will also be placed on small wall beside tub for robe hanging and extra towel drying. 

Give us feedback. We hope you enjoyed the before and after! More to come!